Tob
Preparing for the fight
Verzik Vitur is the final boss in the Theatre of Blood raid. This fight has three distinct phases and requires precise movement, prayer switching, and mechanics knowledge.
Here, you only need to kill Verzik in Theatre of Blood.
How to get there
- Use the Teleport Tree at
::homeand select Theatre of Blood. - Once inside, make your way to the Verzik arena, which is the final room in the raid.
Gear and inventory recommendations
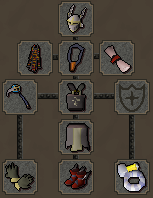
Melee setup
Inventory
- Sanfew serum (or super restores) for prayer restore but in P2 you have a chance of being poisoned which can be mitigated by using a sanfew.
- Super combat potions
- Anglerfish/Saradomin brews and a couple Karambwan for food
- Veng spell in pouch
- Defence lowering spec weapon (BGS → DWH → Elder)
- *Optional* but highly recommended for P3 - Aranea boots to escape webs


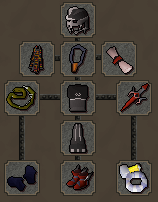
If you have a full Torva set, you can benefit from using it in Phase 1 to increase the damage you take on veng hits from Verzik. Simply overheal to 140hp then put redemption on when taking veng hits.
Below is an example of max gear/inventory with torva:

Fight guide
The Verzik fight has three phases. Below is a phase-by-phase breakdown:
Phase 1
- As you enter, one player must pick up the staff on the floor. Activate Protect from Magic.
- Pre-veng stand in the middle of the arena and start the raid. You should tank Verzik's hits where possible as this helps to lower her health.
- Whoever specs first should use their special attack immediately, then run back to the safespot and drop the staff for teammates so that they can use their special attacks.
Throughout Phase 1, each team member should use their spec and veng to lower Verzik's health.
Note: avoid standing near pillars when they collapse-they deal high damage. They fall down when their health is lowered to 0, but all pillars fall when Verzik's health is lowered to 0 for Phase 1.
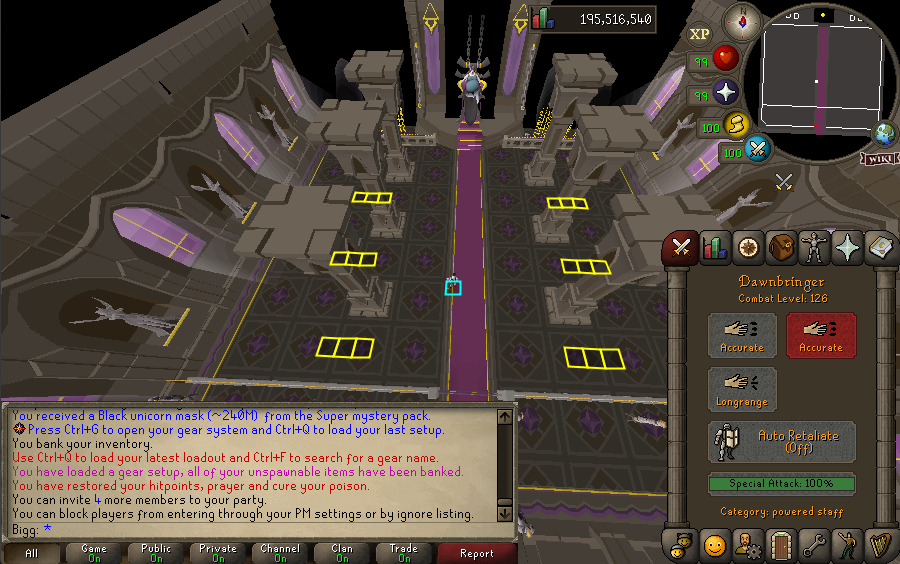
Safe spot tiles for Phase 1:

Phase 2
- Use defence-lowering specs (Elder/DWH/BGS) on Verzik.
- Flinch attack: After Verzik jumps, hit her immediately then step away to avoid her sit attack (massive damage and it stuns you)
- Always pray Magic as her white orbs aren’t threatening but the blood attack towards the second half of P2 can be mitigated with magic prayer.
- Crabs mechanics:
- Healing crabs (red): Spawn every 7 hits. Hit them twice, then return to Verzik.
- Big purple/blue crab: Ignore completely.
- Other crabs: They follow players—step 1 tile away if they approach to avoid 90 damage.
Phase 3
- Dump defence-lowering specs immediately.
- If Verzik targets a player in melee distance, she will only use melee attacks on them (safe for the team).
- Otherwise, she will use blue (magic) and green (range) orbs if the targeted player is out of range.
- Crabs will spawn throughout Phase 3—step away when they’re 2 tiles from you, or run to them to trigger the explosion and quickly run away.
Special attacks
- Sticky webs: Verzik fires webs at all players. You can tank them or dodge.
- Aranea Boots users: You can walk out of webs after being caught.
- Power orb (yellow): Stand on the yellow tile to avoid 90 damage.
- Green ball: If standing alone, you take 74 damage. Share damage by standing next to a teammate or vengeance the hit.
- Enrage (800 HP): Tornados spawn and chase players. Keep moving and attacking.
Hard Mode differences
Phase 1
- Rocks will fall and hit 30s if they land on you. Watch for shadows on the floor to dodge them.
Phase 2
- Verzik’s projectiles leave acid pools. Avoid standing on them by flinch attacking and moving to a different tile after each hit.
- At ~50% HP, projectiles stop leaving acid.
Phase 3
- Instead of 1 yellow tile, there are now 3.
- If you have multiple Scythers, you may skip the yellow orb mechanic by dealing outputting as much damage as you can.
- If not, run between yellow tiles as orbs land. You can all stop attacking at 800hp too and wait for the orbs to spawn, so that you only have to deal with the orbs on their own, rather than together with the tornado attack.
Bigg's Video Guide
Click here to watch the video. This video covers both normal and hard mode!


